Are you frustrated with the results of your outbound marketing campaigns? Are you failing to generate the leads that you need to reach your sales goals? Or maybe you aren’t doing outbound marketing because you’ve heard that you should have all your eggs in the inbound marketing basket?
Rest assured, outbound marketing isn’t dead. What it is, is an increasingly competitive numbers game. But it is possible to share with you how you can send cold emails at scale, stand out from the pack, and get results.
In this guide you’ll discover exactly how to master the art and science of outbound marketing. We’ll cover how to:
Improve your cold email open and reply rates
Land more conversations with your target buyer
Set up a tech stack that enables you to conduct outbound at scale (while keeping costs low)
If you want to have success with cold outbound email marketing, simply follow the steps outlined below.
Let’s begin.
Table of Contents
Chapter 1: Outbound Marketing Basics
Before we dive into the actionable steps, let’s go over the fundamentals of outbound marketing.
First, you will learn exactly what outbound marketing is (and why it is an important part of your overall marketing strategy – and not just for lead generation).
I’ll also show you how outbound marketing helped my company achieve a rank of #254 on the 2019 Inc 5000 with a 3 year growth rate of 1,693%.
What is Outbound Marketing?
Outbound marketing is the process of using targeted outreach to reach your prospective customers. The intent of outbound marketing is to start a conversation that can lead to making a sale, performing market research, or getting press coverage for your company.
While there are other different types of outbound marketing (cold calls/telemarketing, direct mail, trade shows, billboards, radio and TV ads, and other advertising), for the purposes of this outbound marketing guide, I am going to focus on the most low-cost, fast, effective approach for B2B marketers, and that is cold email.
As you will see, cold email continues to be the marketing tactic with the fastest ROI. It’s the most direct and effective way to connect with your prospect, nurture them along the buyer’s journey, and ultimately lead to a purchase.
It’s important to remember that outbound marketing essentially relies on interruption. This is in contrast with inbound marketing, where your prospects are already searching for you.
Outbound Marketing Vs Inbound Marketing
Unlike outbound marketing, the goal of inbound marketing is to leverage content (blogs, videos, podcasts, etc.) to drive traffic to your website so that you can generate leads that can then be converted to buyers.
But here’s the thing: if you haven’t yet had enough direct contact with your target market, how are you going to know what their problems are, and more importantly, the exact words they use to describe those problems?
Putting your customer’s problems in their own words is critical for successful inbound marketing. Without this, your attempts at inbound marketing will likely fail, and that is why it makes a lot of sense to use outbound marketing early on.
In addition, content marketing is a long-term play. It isn’t easy to rank for most Google keywords, and you won’t typically see SEO results from a single blog post, but a single email campaign can rapidly reach potential customers.
Ultimately, it’s not actually inbound vs outbound. Ideally you want to use both. When done well, outbound tactics and inbound strategies complement one another.
Why is Outbound Marketing Important and Important Part of Your Overall Marketing Strategy?
Outbound marketing impacts every other marketing task that you perform, because no matter what type of marketing you are doing, none of it will be very successful if you don’t have a deep understanding of your customer, their problems, and the words they use to describe those problems.
This is why outbound marketing should be a part of any comprehensive marketing campaign.
To put it another way: If you don’t understand your customers’ problems, and the words they use to describe these problems, your marketing will always be off course.
The more effective you are at outbound marketing, the more successful you will be at generating the 1:1 conversations that will lead you to having a deep understanding of your customers most intense needs, wants, and desires.
In other words, outbound marketing is the foundation of all of your marketing efforts.
How Outbound Marketing Helped My Company Go From Zero to Over $100,000 Per Month in Just Five Months
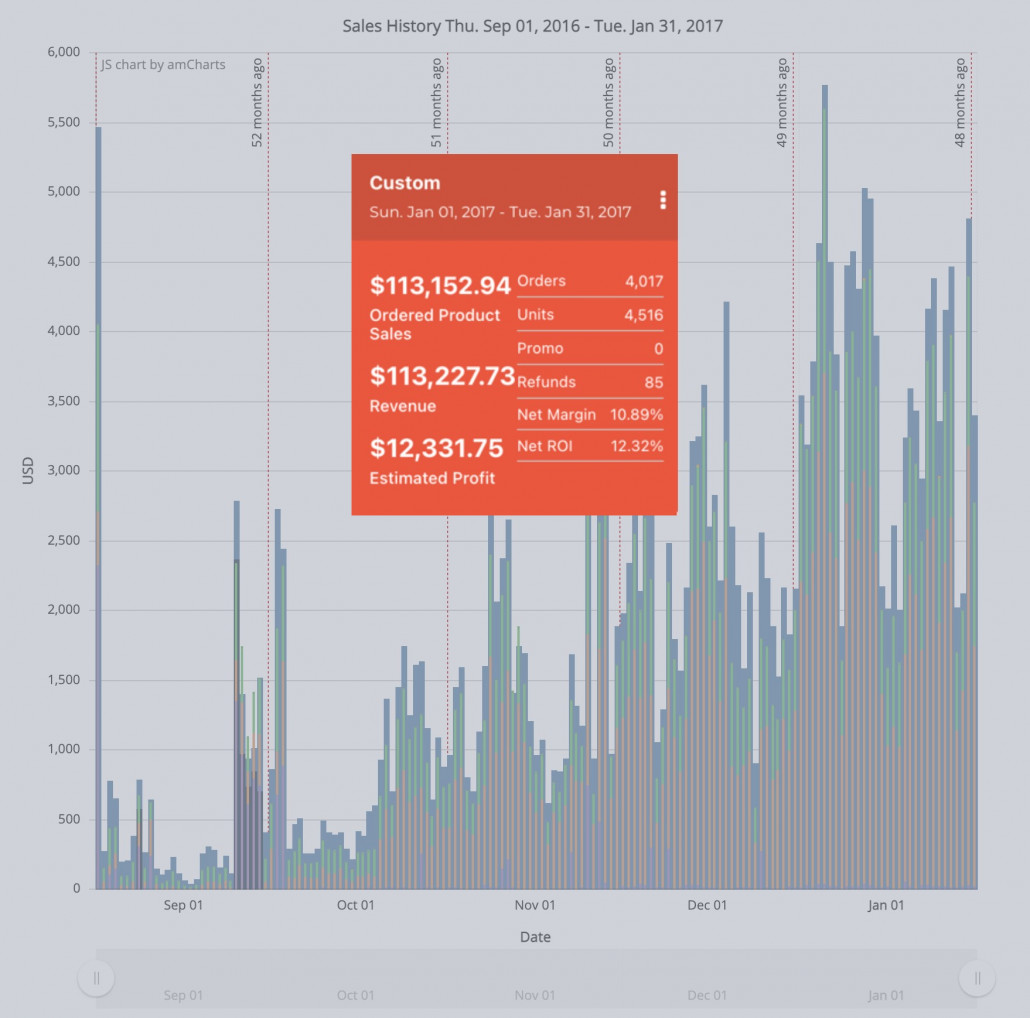
I started my Amazon Hybrid Agency in September of 2016, and within just five months, our monthly revenue had grown to over $100,000 per month.
Note: Unlike a traditional marketing agency, a hybrid Agency generates revenue by partnering with the manufacturer of a given product line and then becoming an authorized reseller (ideally on an exclusive basis) of that company’s products on Amazon.
Obviously, there are a lot of factors that went into my company’s success including website content, communication skills, etc.
But the #1 factor that contributed to our rapid growth was outbound marketing.
For example: If we only sent 10 emails a week, instead of 100 emails a week, the likelihood of our achieving the growth rate that we did would have been significantly less.
Want more proof that Outbound marketing can deliver measurable results fast? Check out:
Chapter 2: Build a Targeted Email List
Now it’s time to talk about how to build a targeted list of prospects.
As with all outbound marketing, cold email is a game of numbers. So I’ll specifically share how to find your prospects’ contact information at scale, so that you don’t run out of names.
In this chapter, you will find tools that we have used to generate tens of thousands of email addresses, plus how we verify these email addresses for accuracy.
When it comes to building an email list, you have a lot of options and it is beyond the scope of this guide to cover every option available.
Your job is to simply pick one tool to get started with. Here are our 3 favorites.
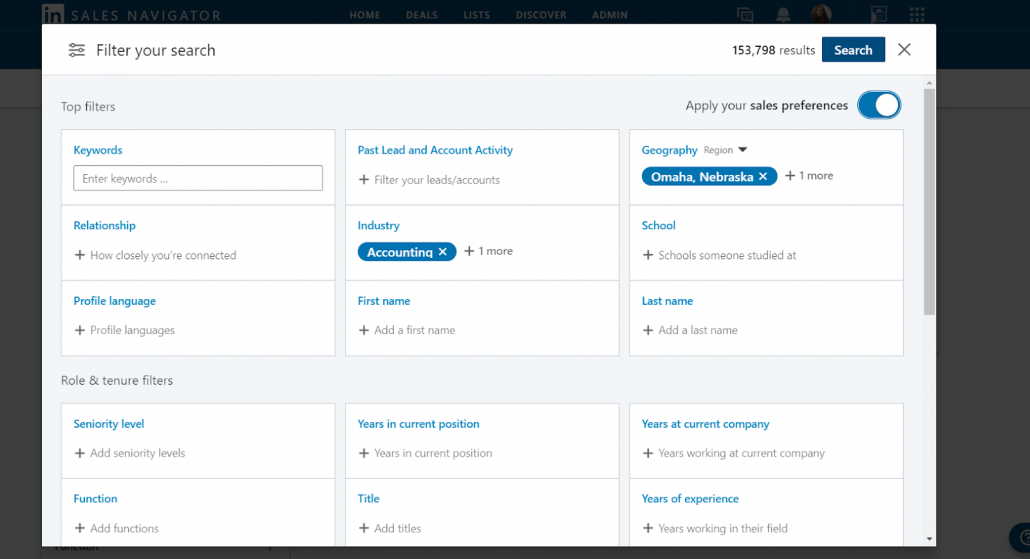
LinkedIn Sales Navigator
LinkedIn Sales Navigator is the paid version of LinkedIn and it will run you about $80/mo on a monthly subscription.
With Sales Navigator, you can perform advanced searches with ease. However, Sales Navigator isn’t going to give you the contact’s email address.
Instead, you can make contact with your prospects via LinkedIn InMail, though there are restrictions on the number of messages you can send.
If you want to extend the functionality of Sales Navigator by automating the sending of connection requests, adding the contacts to your CRM and enriching those contacts with additional information (like email address), you can do that using the Sales Navigator Search Export on Phantombuster.
UpLead.com
UpLead(4.8/5 on G2) is a B2B prospecting platform that provides the highest quality B2B contact & company data. Features include: real-time email verification, worldwide contacts in over 200 countries, 50+ search criteria, technology tracking, account based marketing, competitor intelligence, email pattern intelligence, social profile links, Salesforce & 12 other CRM integrations, robust API and more.
UpLead has a database of 54 million contacts and they say they have 95% accuracy. The software starts at $99/mo.
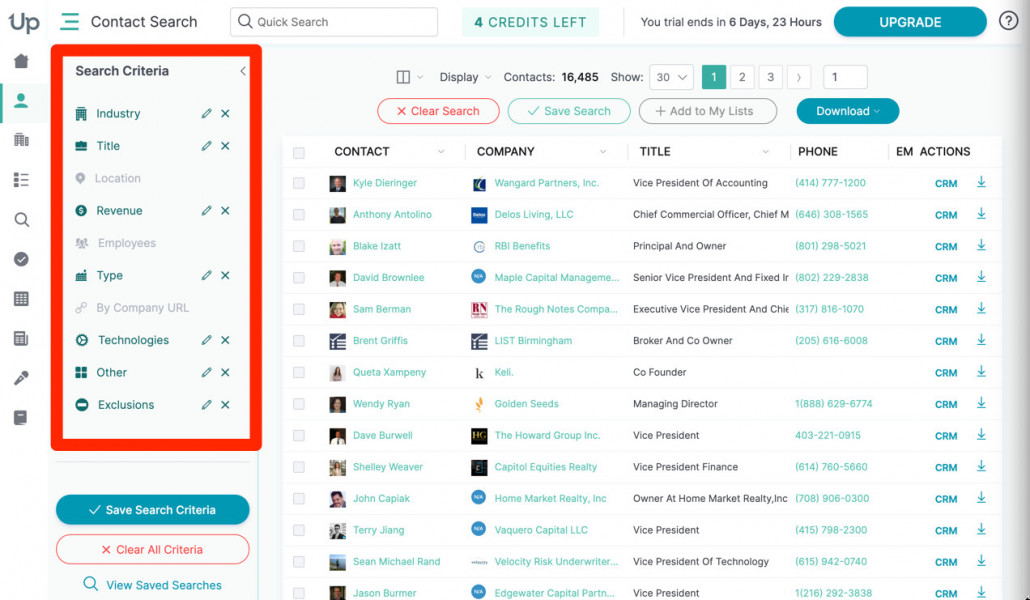
To create a list of targeted prospects in UpLead, simply enter the search criteria from the available fields.
The search fields that are available include industry, title, location, revenue, employees, type of business, company URL, technologies used, and other – which includes two sub-filters: social links and year founded.
Unfortunately, UpLead doesn’t have the ability to create multi-step email campaigns, so you will need to use a second application for that.
Apollo.io
Apollo is by far my favorite tool for building highly targeted lists of prospects for your offering.
Like UpLead, Apollo gives you email addresses…plus, within Apollo’s interface, there is a way to verify the email address is accurate. And while not perfect, Apollo’s verification process is pretty decent.
Apollo has a database of roughly 200 million contacts, plus the 25 million companies they work for.
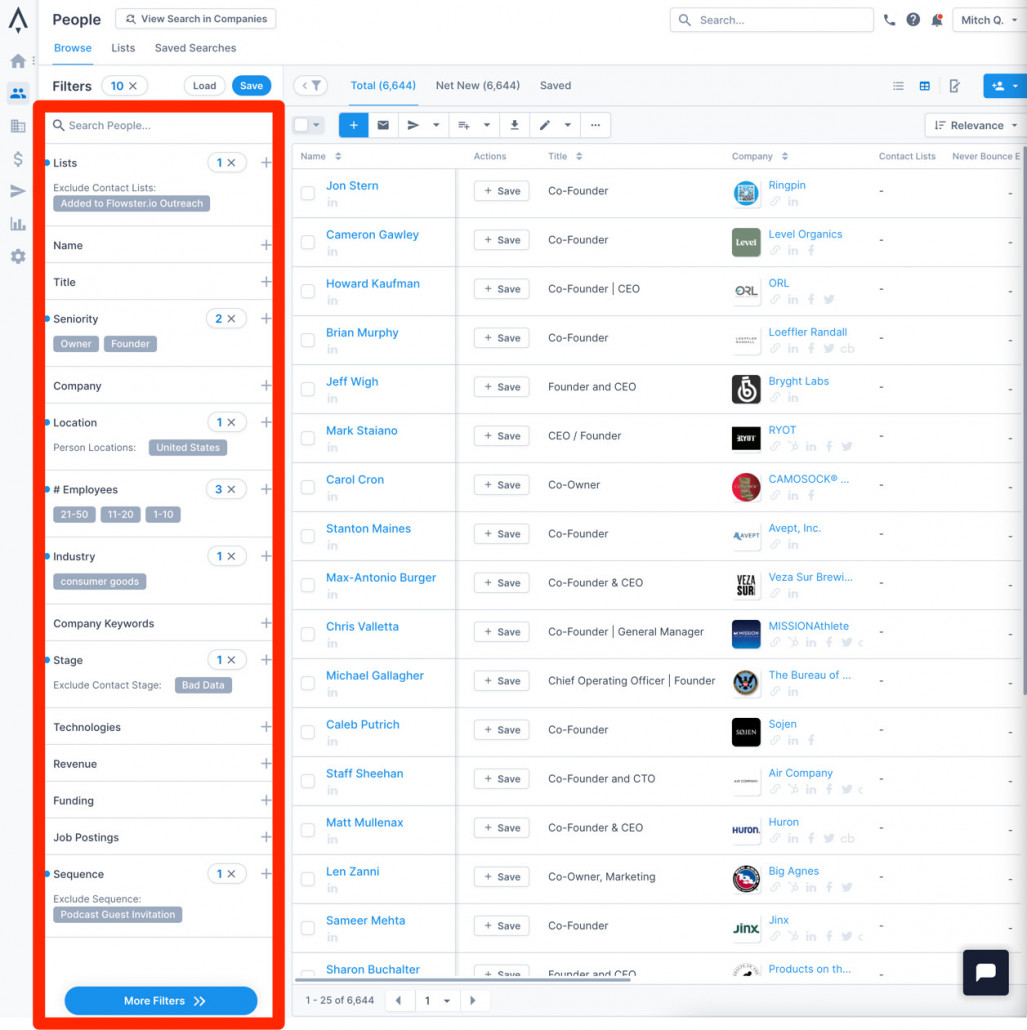
To make creating hyper-targeted lists super easy, Apollo offers 60+ data attributes.
I use Apollo for all my list building. Here’s a screenshot of the filters that we used to create a list of potential guests for Flowster’s new podcast.
As you might guess, Apollo has plenty of competitors and you can see them on G2.
I have not personally tried every tool and encourage that you do your own research on which tool is best for you.
Here’s a video of Mailshake’s head of sales (Luiz Centenaro) showing you how he uses LinkedIn Sales Navigator and Seamless.ai to generate thousands of leads in minutes.
For any other tool you’d like to try, I’d recommend you start with reading the reviews on G2.
Chapter 3: Write Personalized Emails (At Scale)
This chapter is all about creating email messages that will get the highest open and reply rates possible.
If you are doing your outbound manually, personalization isn’t that difficult, but if you want to scale up your outbound marketing efforts, personalization becomes a much greater challenge.
So, having a tool that will allow you to personalize your emails at scale is vital to your success.
With that said, here are the tools and strategies for personalization that I personally recommend.
Subject Lines
Subject lines are critical to your success with outbound marketing, because they play a critical role in determining if your email gets opened or not.
Think of your subject lines as your first impression.
Make a bad first impression, and the relationship is over before it begins.
Make a good first impression, and your email gets opened.
Ideally, you want to write a subject line that will pique curiosity.
However, you need to be careful to avoid any hype that would be deemed as click bait because that will lead to increased spam complaints, and if you get enough spam complaints, you can damage your domain reputation and that will limit your ability to get into your recipient’s inbox.
Note: We’ll cover a simple strategy to protect your domain reputation further on in the guide.
One of the first things to understand about subject lines is that they appear differently on desktop vs mobile.
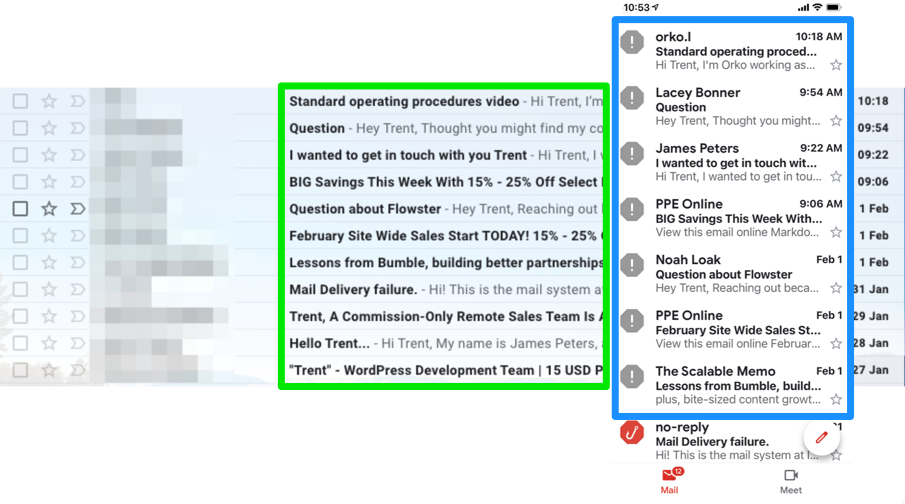
In the image below, I have included a screenshot of my spam folder; both from my desktop and from my mobile device.
Notice how on mobile the portion of the subject line that is visible is a lot less. So, with 77% of email opens happening on mobile, I recommend you keep your subject lines to about 50 characters or less.
The only exception would be if you have already done enough research to determine that your target audience has a bias towards opening their emails on desktop.
Subject Lines Best Practices
The most effective subject lines should contain as many of the following elements as possible:
1. Personalization
Most of today’s email marketing tools allow you to insert custom fields (first_name, company, etc..) into the subject line and I recommend you take advantage of this as often as possible.
2. Curiosity
We all love surprises and/or a good mystery, and a well crafted subject line can help you tap into that emotion in your recipient’s mind. The more curiosity you can create, the higher your open rate is going to be. But be careful though. As I said earlier, if you go overboard and the content of your email doesn’t sufficiently support the hype of your subject line, you risk pissing your recipient off and having your email marked as spam.
3. Ego Stroking
Ego stroking is one of the most effective ways to increase your open rate and it is much easier to do than you might think. In my case, one of my automated campaigns sends and email with a subject line that reads, “We’d like to interview you on our podcast”
Obviously, many people love the idea of being a guest on a podcast, and that is why this subject line works so well. But what if you don’t have a podcast? Don’t worry. We’ll cover how to do the ego stroking technique without a podcast a little later in the guide.
4. Urgency
Whenever we do a product launch, we make extensive use of email. Towards the end of the launch, we start using subject lines that make it clear that time is running out.
The key to using scarcity (urgency) is to make sure that it is authentic.
For example, if you can only on-board 5 clients a month, and you have just one slot left, using that in a subject line would be authentic, plus it would convey the sense of urgency to your email recipients.
5. Special Offers
Using a special offer in your subject line in an outbound marketing campaign is a risky move, and I would only recommend this technique if your company is reasonably well known in your industry niche. Otherwise, you are more than likely going to look too spammy to get traction.
6. Other Resources
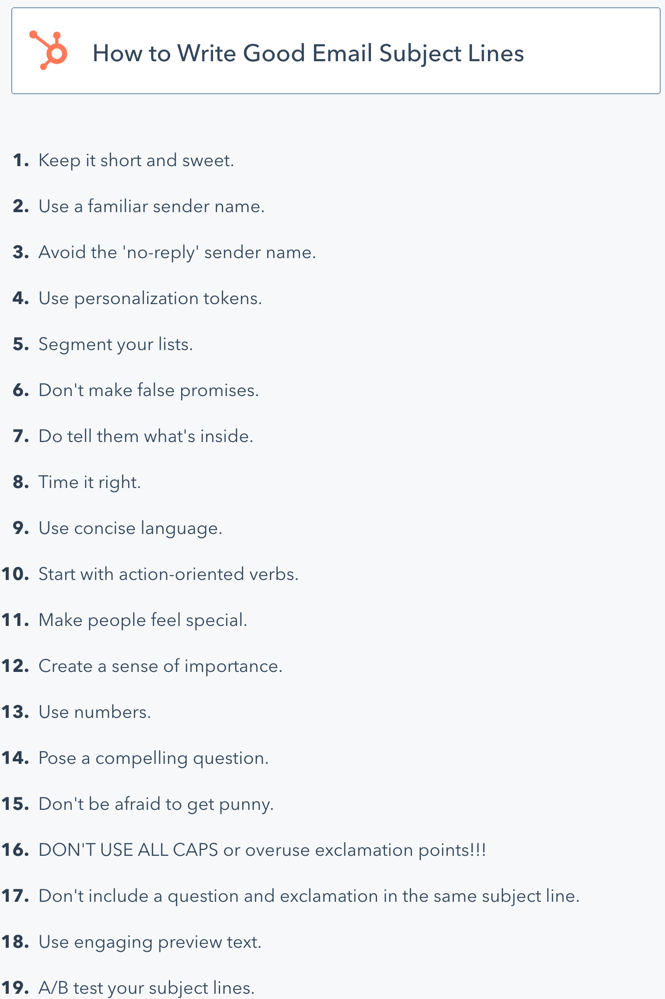
According to Hubspot, there are actually 19 techniques involved in writing great subject lines:
For more insights into each of these techniques, visit Hubspot’s article on how to improve your subject line.
When you’re first getting started, you can get an idea of how effective your subject lines might be using a subject line rating tool like CoSchedule or SubjectLine.com.
7. Split Testing
No matter how much thought you put into crafting the perfect subject line, the reality is that you are really working with only your opinion of what is going to work best – aided hopefully by a rating tool.
Data is a much better predictor of success, and so I encourage you to split test your subject lines as much as possible.
Most email software makes split testing very easy to do if you are following a data-driven process. See the screenshot from Apollo below. You should split test subject lines and regularly rework the lower-performing subject lines to increase open rates.
Opens vs Clicks and Replies
So now that you understand how to optimize your subject line to maximize your open rate, I want to remind you that sometimes open rate can come at the expense of either click rate or reply rate.
In order to get the maximum benefit from your outbound marketing campaign, you need to know what your objective is.
Are you looking for clicks, or are you looking for replies?
It is vital that you keep this in mind!
After all, if you are really hoping for replies and you aren’t getting any, your overall campaign isn’t working, regardless of how well you have optimized your subject lines.
The reality is that the performance of your outbound marketing campaign should be judged on the basis of the objective of the campaign, and that objective is not likely to be open rates alone!
Personalized Messages
I highly recommend you make use of as much personalization in your outbound marketing emails as possible.
The first type of personalization is pretty easy to do using custom fields that can be populated with things like the recipient’s company name, website URL, LinkedIn profile URL, etc.
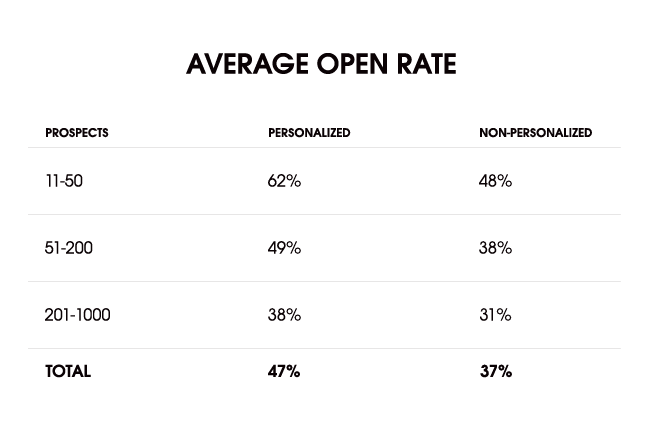
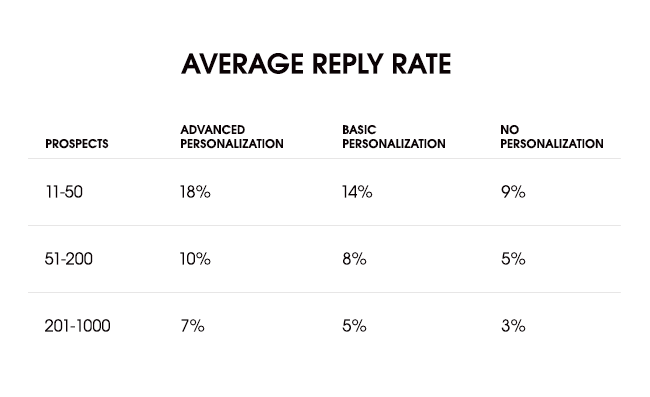
Studies have shown that when basic personalization like I described above is used in a cold email campaign, the average open rates are as follows:
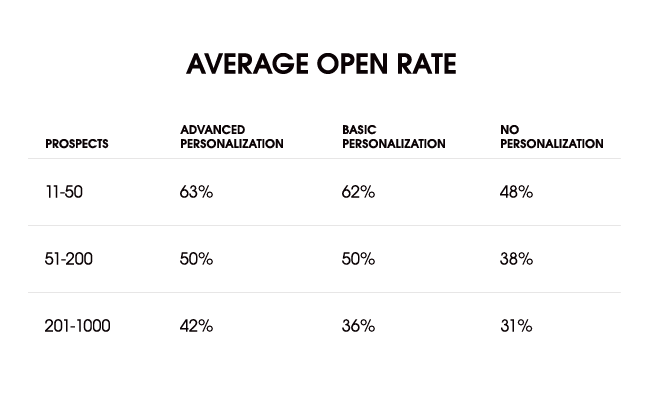
Should you wish to increase your level of personalization in your emails using more advanced techniques, open rates will improve by as much as 10%.
Examples of more advanced personalization could include creating a custom field to hold a full opening sentence that would say something unique about the recipient’s company, website, or social media profile.
Obviously, someone has to write this sentence, so if this is the route you plan to take, you need to keep that in mind as it could easily limit the number of emails you can send per day.
With that said, one low-cost way to get these sentences written is to employ a virtual assistant(s) to write them for you – using some kind of instructions that you would provide.
Personalized Images
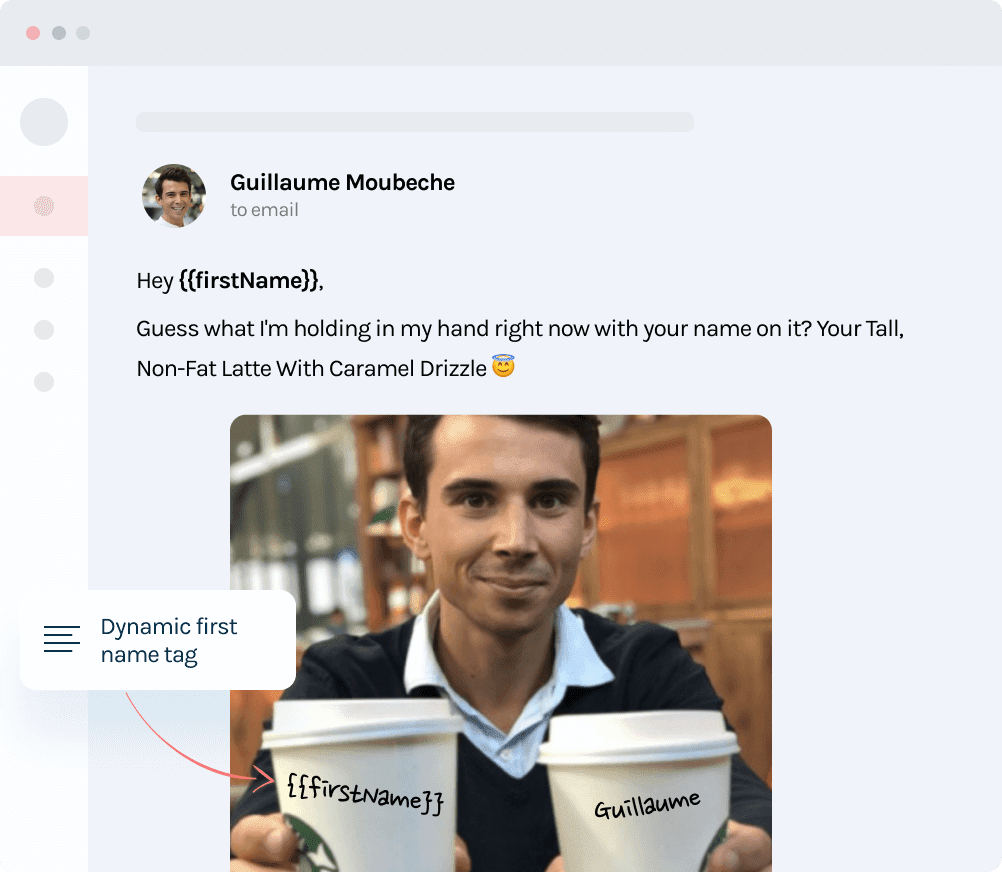
As a part of more advanced personalization in our campaigns, we like to use personalized images.
To user personalized images at scale, you are going to need more software. True, that makes your tech stack more complicated and costly, but when you consider the increase in reply rates, it is well worth it.
As you can see above, when you add in more advanced levels of personalization, the industry benchmark you can expect to receive is somewhere north of 7%, depending on the number of recipients in your campaign.
In our case, thanks largely to our use of personalized images, our results have been much higher than industry benchmarks.
As you can see in the image below, one of our newest campaigns has received a reply rate of 23% on 725 emails sent.
If you want to insert personalized images into your outbound marketing campaigns, there are a few options that allow you to make personalized images in an email. As with the tools that help you build your email list, just pick one and get started.
Lemlist
The first option is Lemlist and their software offers 2 different ways to personalize content in an email.
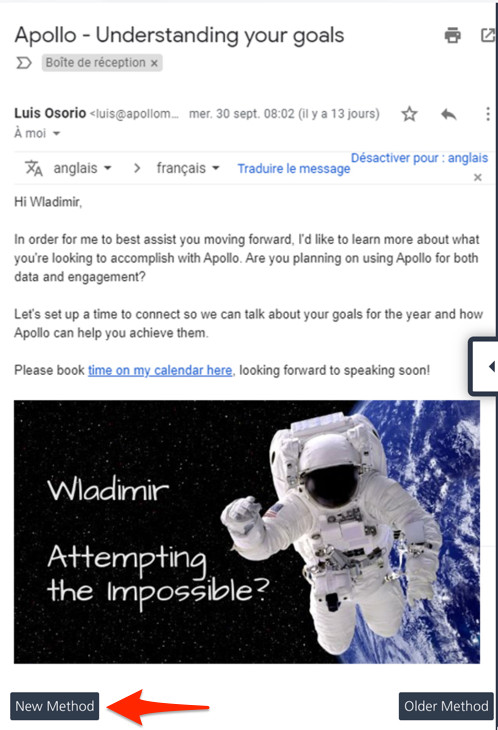
The first method is to overlay custom text on an image background of your choosing.
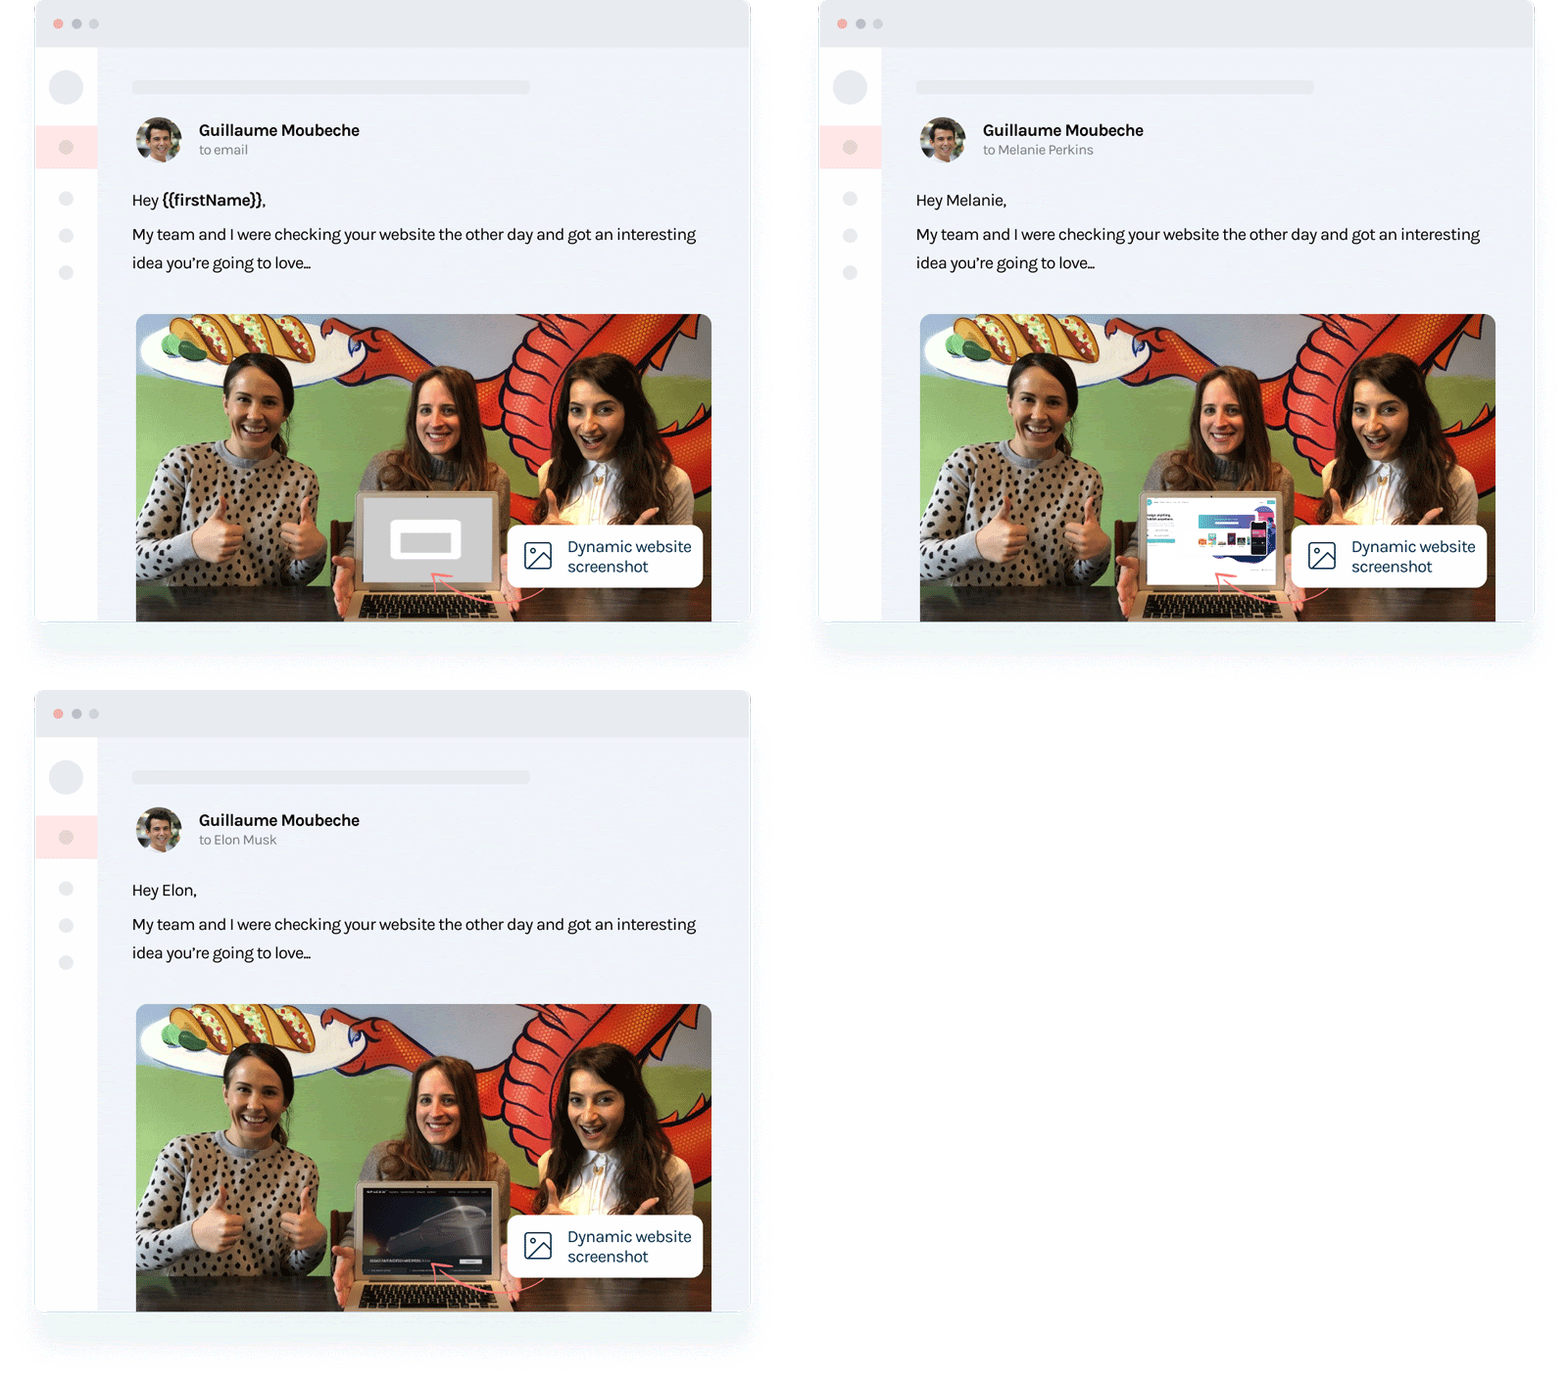
The second method is to overlay a screenshot of a company’s website, logo, video thumbnail, etc, on top of an image background of your own creation.
Uclic
Starting at just $8/mo, Uclic is a software application that allows you to insert personalized images into your outbound marketing campaigns.
The product works not just for email but also for messages sent via LinkedIn.
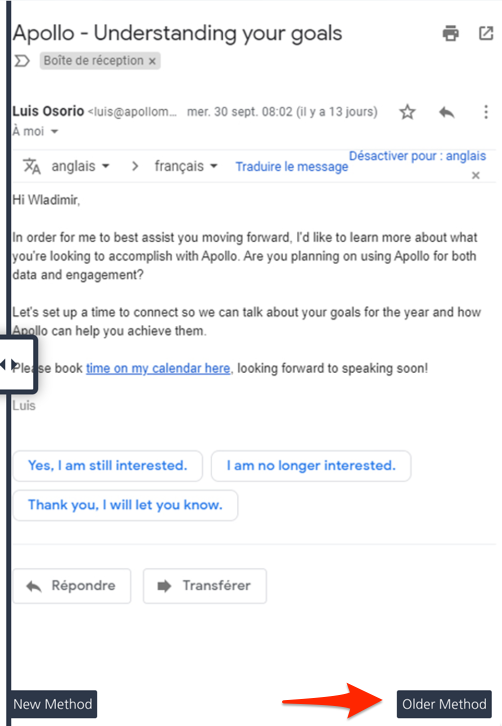
Here’s an example of a LinkedIn message without the personalized image:
Now here’s an example of of the same message with the personalized image included:
Hyperise
The tool that we prefer for image personalization is called Hyperise.
Hyperise starts at $99/mo and comes equipped with some pretty powerful image personalization features that Uclic doesn’t yet offer. And unlike Lemlist (which we also use), Hyperise works via LinkedIn and not just email.
We actually start our outbound marketing campaigns by making a connection request via LinkedIn before we send any cold emails. This is a more advanced strategy that we’ll cover in more detail in chapter 6.
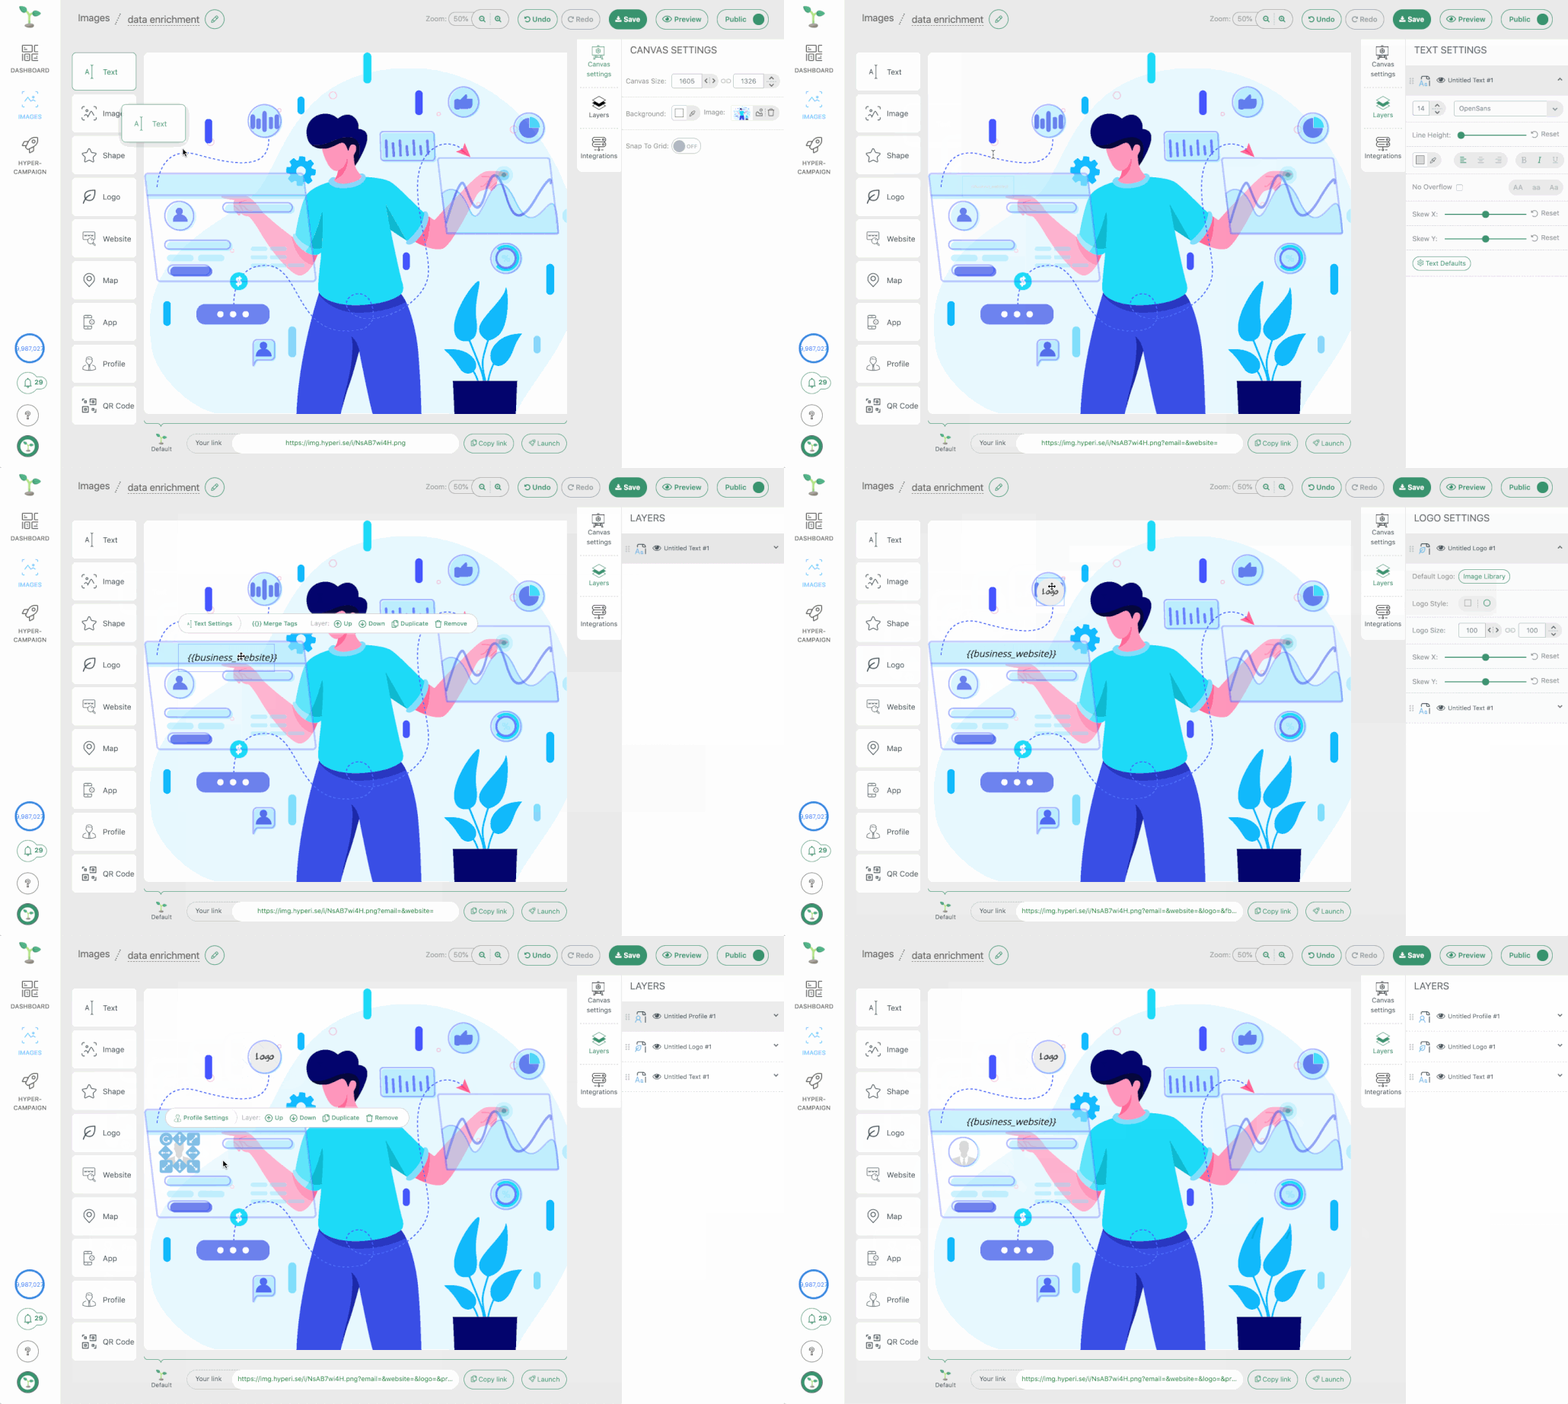
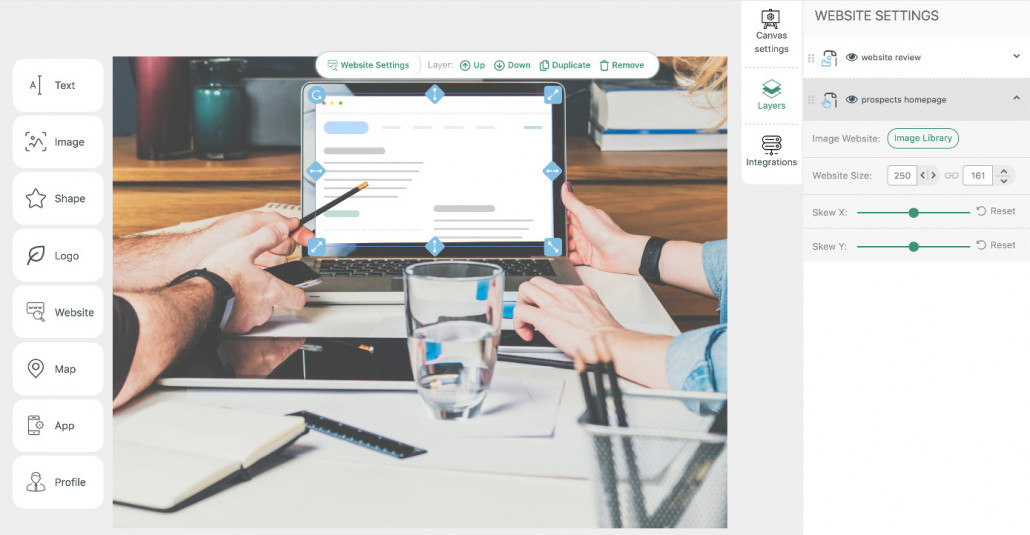
At the core of the Hyperise Toolkit is the dynamic Image editor, enabling 16 points of personalization.
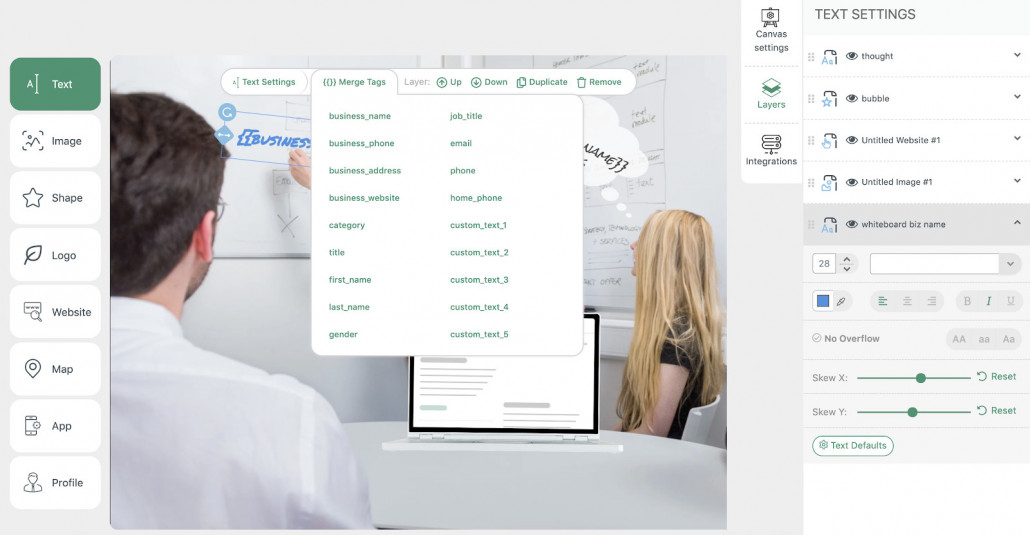
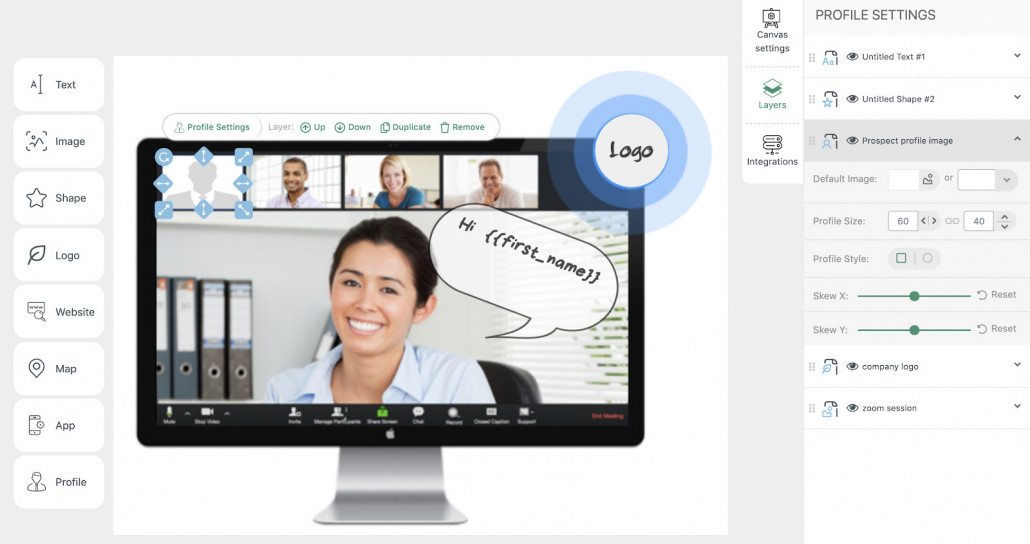
Here’s just a few examples of the types of image personalization that you can do with Hyperise.
Dynamic Text: Add dynamic text layers such as Firstname, Lastname, Gender, Company Name, Job Title, Phone Number, Website, Address.
Website Screenshots: Add website screenshots automatically, from the prospect’s email or website domain.
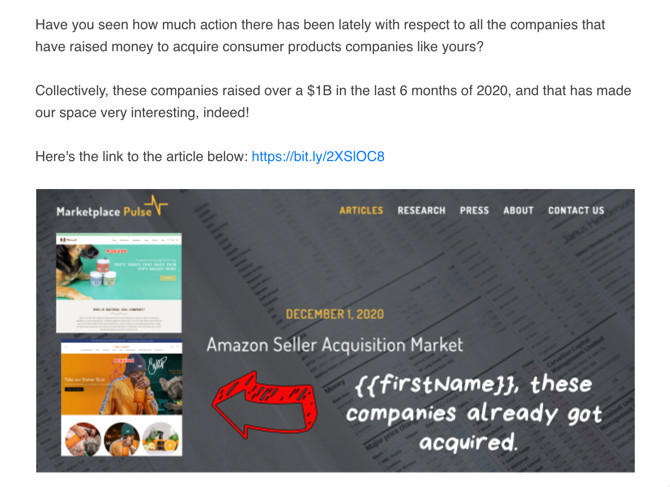
Here’s an example of an image from one of the emails in one of our outbound marketing campaigns:
As you can see, we haven’t gone overboard with the personalization in that we are only personalizing the text that overlays the image.
Instead of more extensive customization, what we are doing with this email is using a small amount of personalization to draw the attention of our recipient to the fact that in their space, now is a very good time to consider selling their company.
Sender Names
Before I move on to setting up your tech stack, I would be remiss if I didn’t talk about the importance of sender names.
Think about the emails you receive each day.
When you see an email from Microsoft (or some other company name), how does that make you feel? Does it increase or decrease your motivation to open the email?
I don’t know about you, but I bulk delete virtually every email that comes to me with a sender name that is the company name.
Remember: people want to connect with other people… not so much with companies.
As a result, you will be far better off if your sender name is your real name, or even your email address (sallym@acmewidgets.com).
Definitely do NOT send from noreply@company.com because that is an instant flag for the recipient that they are one of hundreds or thousands of people that are receiving this email.
Chapter 4: Set Up Your Tech Stack
Now that you have your messaging dialed in, you are going to need to build the technology stack needed to allow you to send your messages.
Unfortunately, there are several approaches and no one “best” tool for doing outbound marketing campaigns at scale.
In fact, it is the opposite. It is a very crowded landscape with virtually endless software applications to choose from.
As we have not personally tested every single tool in the market, this guide will be limited to going to instead provide step by step instructions for the tools that have stood out in our research and testing. We can personally vouch that these tools will work well and we’ll show you exactly how to set them up to do cold outreach at scale.
Overview
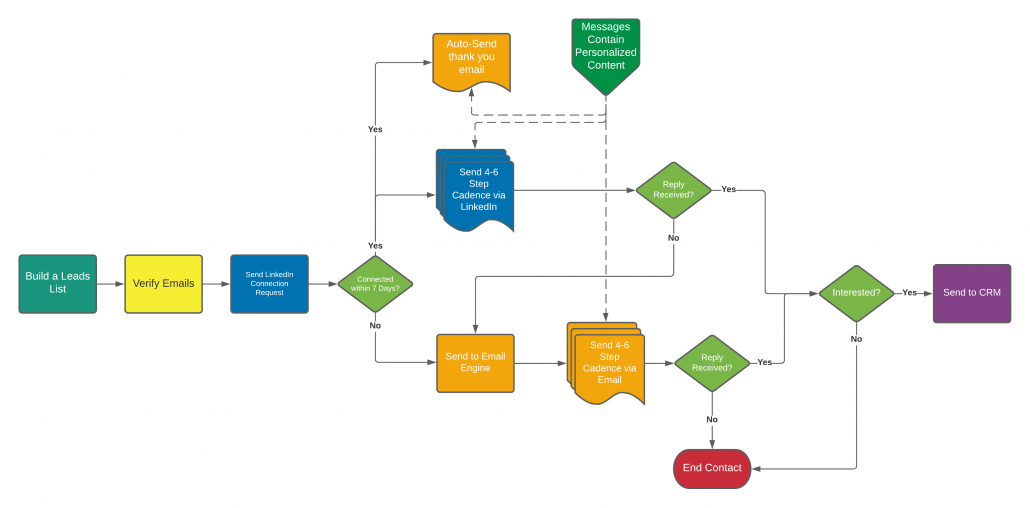
As you can see in the image below, I recommend that you build a tech stack that first sends a given contact a LinkedIn request.
If the connection request is accepted, then you will send a series of messages via LinkedIn, and if they reply with interest, you will move the contact into your CRM for further manual interaction.
If they don’t accept your connection request, or they never reply to any of the messages you send on LinkedIn, you will then send them a series of emails directly to their inbox.
If you receive a positive response to any of these emails, the automated multi-step campaign will stop and you will then import the contact into your CRM for further manual interaction.
So how do you make all this happen at scale, and how do you personalize the messaging as we discussed earlier?
You have two options.
The first is to combine some of your labor with a virtual assistant to perform the daily outbound marketing activities for you.
These activities would include:
Making the LinkedIn connection requests
Creating any personalized images needed to increase the likelihood of a response from the prospect
Sending the 4-6 messages via LinkedIn as per your pre-determined schedule
If the connection request isn’t accepted, adding the contact to Lemlist after 7 days so that your email campaign can start
If the contact does accept your connection request, but doesn’t reply to any of your messages, adding the contact to Lemlist after 10-12 days (depending on the length of your outbound cadence) so that your email campaign can start
For contacts that do reply with interest, manually creating a deal, company, and contact record in your CRM so that you can handle additional manual interaction to move the opportunity towards a win
As you might imagine, to do this at scale without automating portions of the process will require a fair amount of VA labor.
The second option is to fully automate this process so that you don’t have to employ a virtual assistant, and we’ll cover that in more detail in the next chapter.
For now, let me explain the tech stack in more detail so that you understand what each piece does.
Building Your List
Regardless of what application you use to build your list, it is important that you have access to more than just an email address.
Ideally, you want records that have populated data for:
Email
Full Name
Title
Company
Website URL
LinkedIn Profile URL
Phone
This is one of the reasons why we use Apollo. They have all this data and the app costs only $99/mo.
Clean Your List
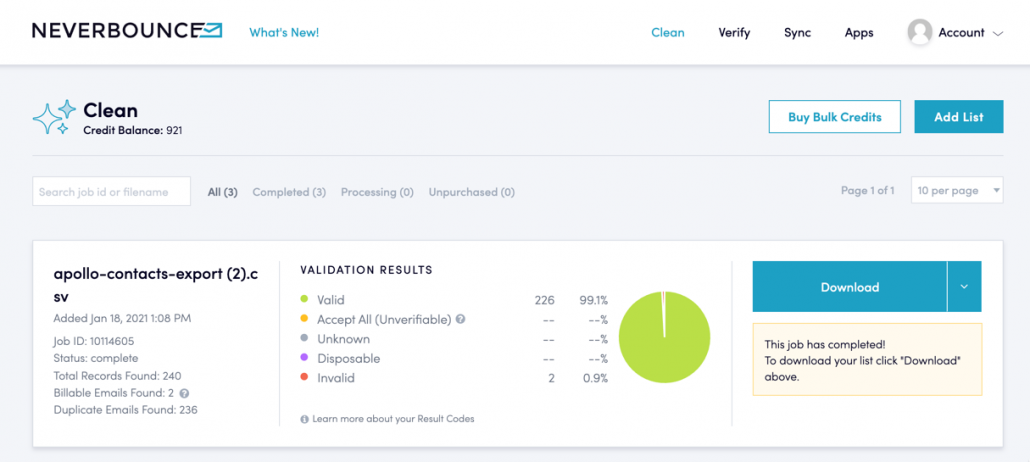
While Apollo does claim to have fully verified email addresses, in my experience, that isn’t 100% accurate and the bounce rate for Apollo’s “verified” emails is higher than I would like.
You will definitely want to keep bounce rates low, since high rates can affect your domain reputation and lead your emails to be marked as spam.
For this reason, we rely on Neverbounce for an extra level of verification. Neverbounce is very inexpensive and their verification process is highly accurate.
Connect on LinkedIn
I much prefer to use software rather than human labor, and as a result, I rely on two applications for LinkedIn connections.
The first is Hyperise, which we talked about earlier in this guide. Hyperise seamlessly integrates with Expandi and allows me to easily create custom images at scale for the messages we’ll be sending via LinkedIn (as well as Lemlist).
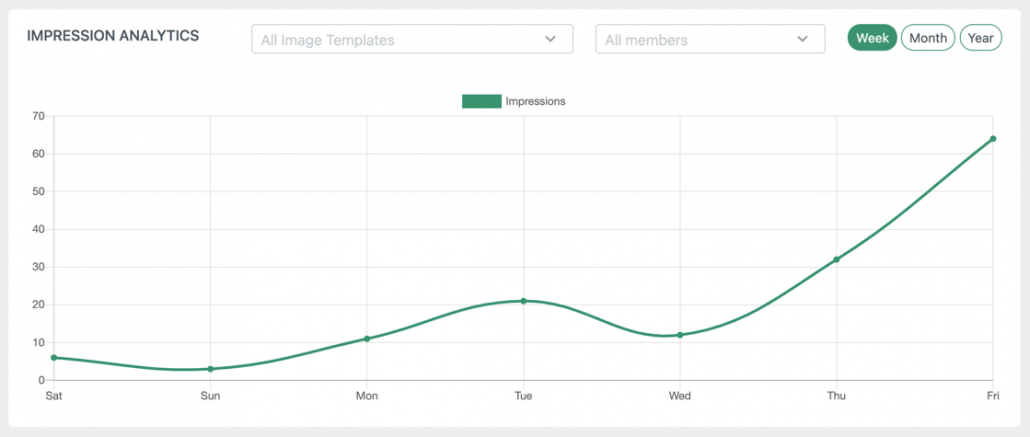
One of the many benefits of Hyperise is that they provide you with an impressions report in their dashboard, so you can easily see trends.
Once you have your custom images set up and ready to go, you can use Expandi to actually send the connection requests – and all the follow up messages.
Within Expandi, you can create as many different campaigns as you like, and each campaign can have a unique schedule, set of messages, and list of target contacts.
Then for each campaign, you can quickly view reports that allow you to assess the effectiveness of your campaign.
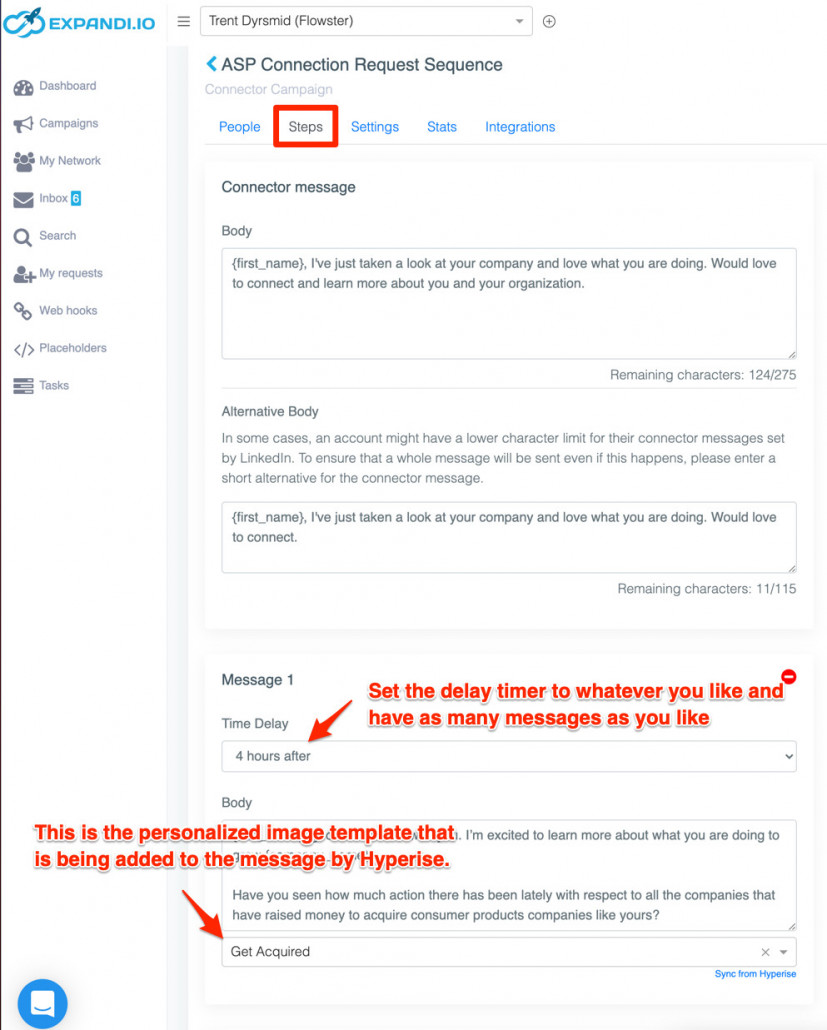
For each campaign you create, you can write a number of messages. Each message is a “step” in the campaign and you can create a custom schedule that determines how much of a delay there will be between each step.
As well, if you are using Hyperise, you can specify which personalized image template is to be used for each step in the campaign.
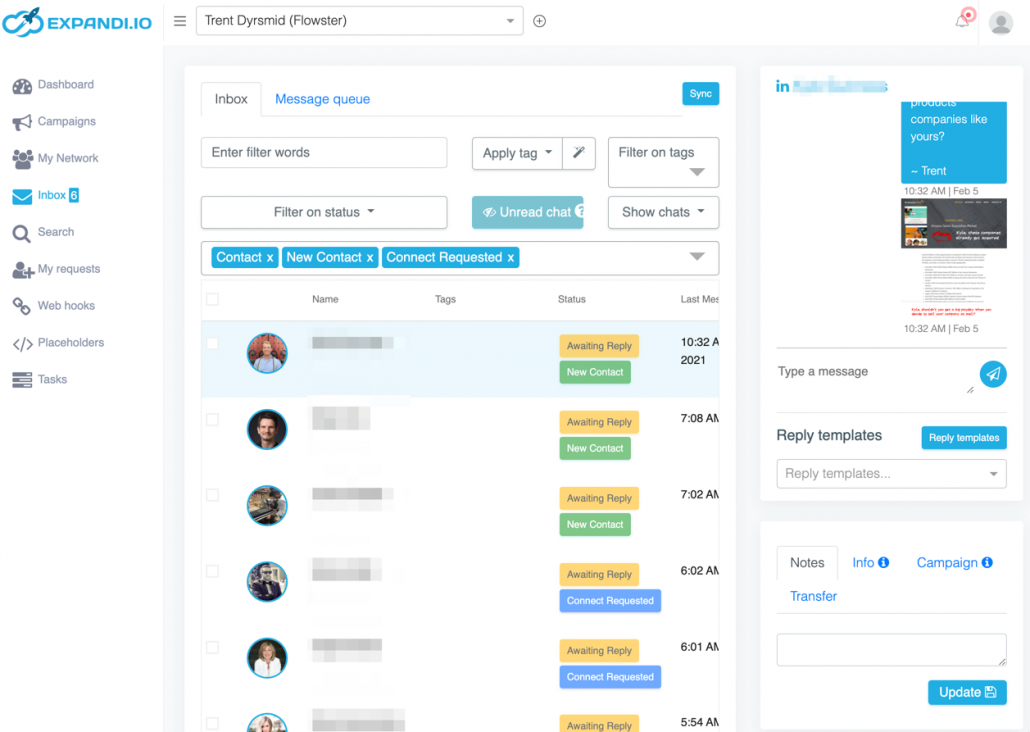
Additionally, I rely on Expandi to manage the replies received.
The reason that I use Expandi to manage replies is because of the tagging feature. With the tagging feature, I can apply a tag to a positive reply, and when that happens, a zap will auto-create a new deal, company, and contact record with a pre-scheduled follow up task in my CRM.
We’ll cover how to do this in the next chapter. For now…just know that it saves me a lot of time!
Send Them an Email
Only about 20% of the people that you send a connection request to are going to accept that request, so unless you want to just give up on the 80% of the people you reach out to on LinkedIn, you are going to need to continue to message them outside of LinkedIn.
Also, one of the reasons we start with LinkedIn is that even if someone doesn’t accept your LinkedIn request, they may have seen the request and have a higher likelihood of recognizing your name and interacting with you once you email them.
For email, we use Lemlist because it allows us to easily send the highly personalized images that we talked about back in chapter 3.
To create personalized images in Lemlist, you can either use the native functionality of the application, or you can again use Hyperise.
Sidebar: Hyperise does integrate with Mailchimp, Mailshake, Infusionsoft, Drip, and many, many more. So if you are already using another email solution, feel free to continue with it.
In our case, we use Hyperise because we want to use the same set of personalized images that we used in our Expandi campaigns.
Hyperise works equally well with Expandi and Lemlist, so that is easy for us to do.
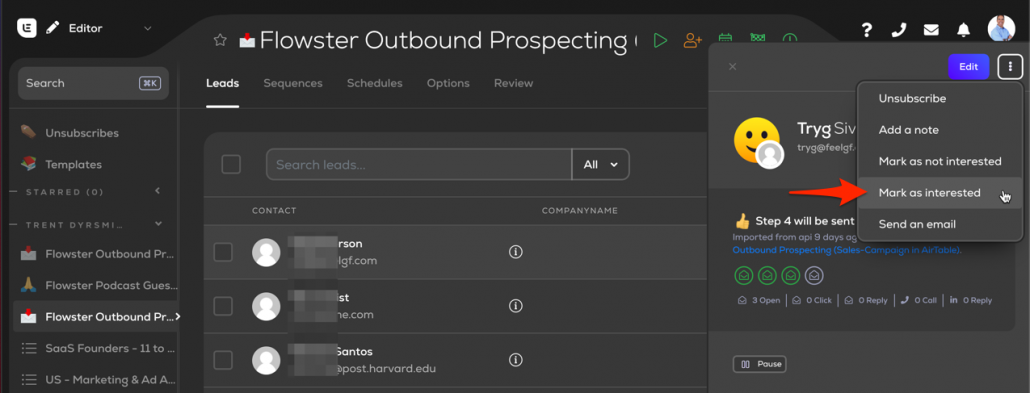
The other thing that Lemlist makes easy to do is to mark a given contact as interested after we have received a positive response from them.
As you will see in the next chapter, when a contact is marked as interested in Lemlist, that can be the trigger for a zap which then creates a deal, company, and contact records (with a pre-scheduled follow up task) in your CRM… which is a huge time saver.
Just as importantly, by relying on the zap, you won’t forget to create the record in your CRM!
Store Your Contacts in a CRM
Our CRM of choice is Pipedrive, but there are many to choose from so you can use pretty much whichever CRM you prefer.
Having said that, you do need to have a CRM because if you are relying on spreadsheets, or worse, your memory, all sorts of opportunities are going to fall through the cracks.
By meticulously keeping track of all our opportunities in our CRM, I am also able to track my close rate over time.
As you build your sales team, being able to keep track of this – as well as other sales KPIs – is incredibly important.
We’ll discuss how to automate this mundane yet very important task in the next chapter.
Chapter 5: Leverage Automation
Now that you have mastered the basics of outbound marketing, it’s time to cover some of the ways that you can automate your campaigns. If you aren’t already relying on automation, know that this is absolutely essential to doing outbound marketing at scale.
Specifically, we’ll reveal a number of methods that you can use to eliminate reliance on human labor to make the system work effectively, day after day after day.
We’ll also cover how to monitor the “machine” that you’ve built so that, in the case of any malfunctions, you will be able to easily troubleshoot and repair the system.
Let’s get into it!
Automation Best Practices
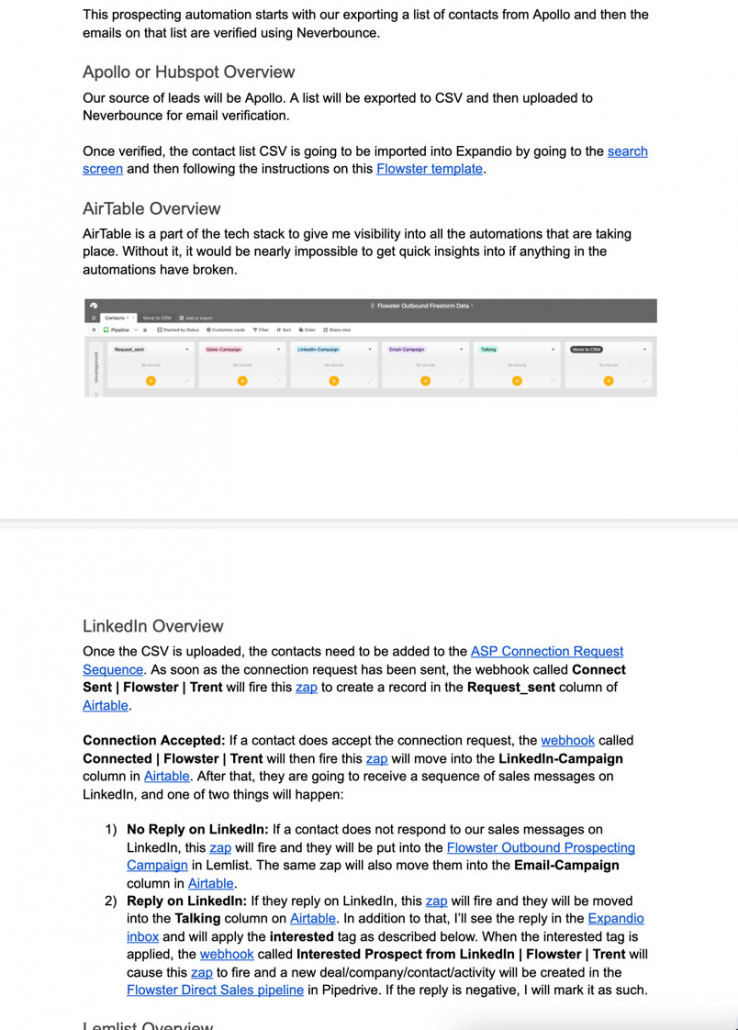
Whenever I create a complex automation system relying on different tools, I like to document the system in plain english with links to all of the various moving parts.
After all, what happens if something breaks days/weeks/months after you’ve built the machine – say one of the software tools you’ve used updates their API? If you have your system documented, you won’t have to rely solely on the memory of what you’ve built.
Here’s an example of what I mean:
With clear documentation like what I have shown above, it makes it a LOT easier to troubleshoot, so I highly recommend you take a similar approach.
Zapier
When it comes to automating processes that require connections between multiple applications, Zapier is my preferred tool. They have a massive number of integrations and their interface makes it easy to create a trigger event in one app that then causes other actions to happen in other application(s) that you choose.
The reason that we’re such a fan of automating as my of my work as possible are:
Not having to do this manually saves a lot of time
Using software to do things that I used to do manually significantly decreases the chances of human error
The possibilities for what you can do with Zapier are endless!
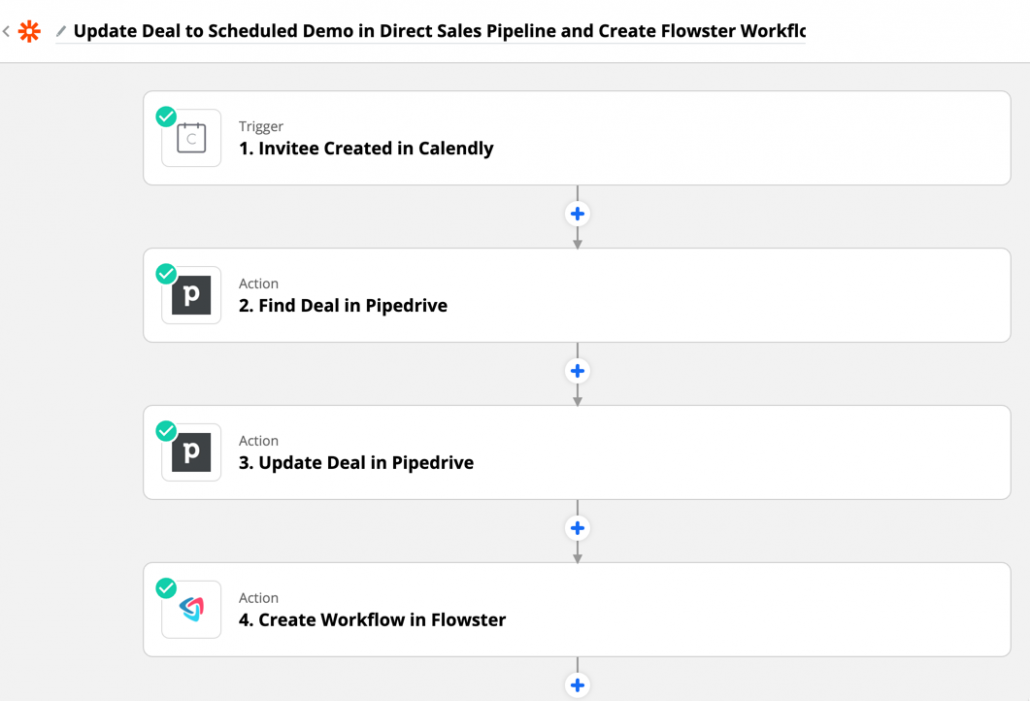
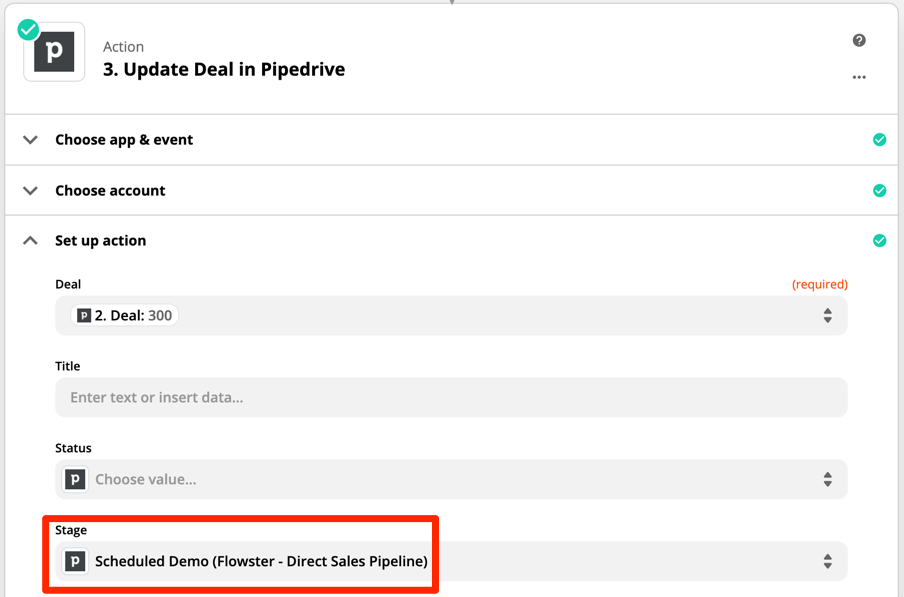
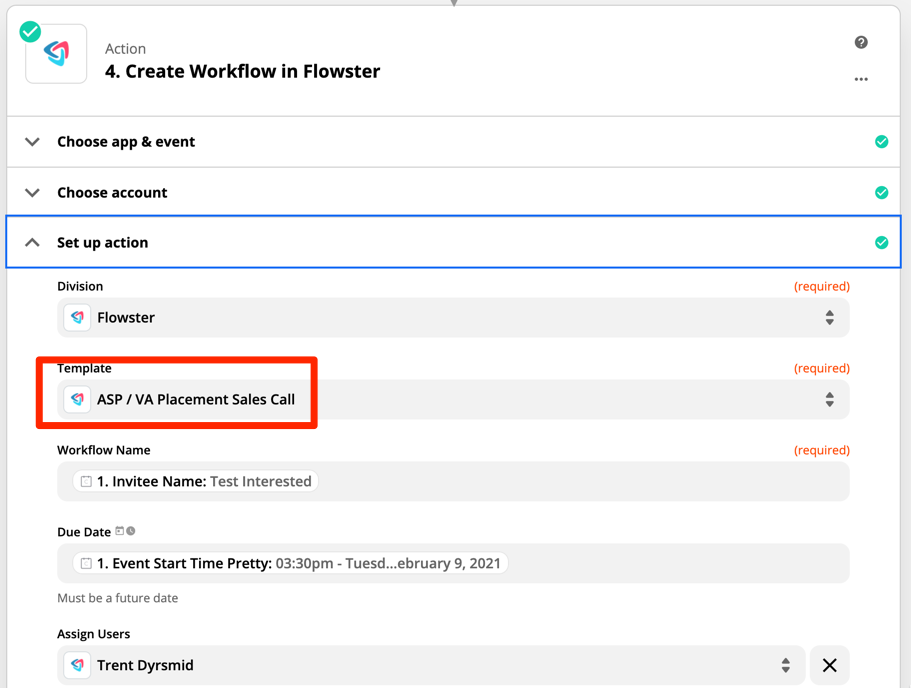
For example, if someone schedules an event in my calendar, Zaps can update that contact’s deal stage in Pipedrive and then create a workflow in Flowster.
As you can see in the image below, the logic for this zap is pretty simple.
To make this easier to understand, I’ll break down the steps for you.
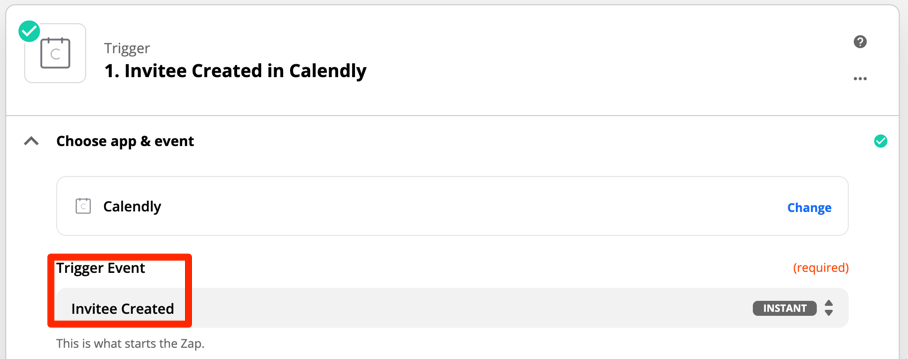
First, we choose a trigger. In this case, the trigger is a new event (appointment) is created Calendly.
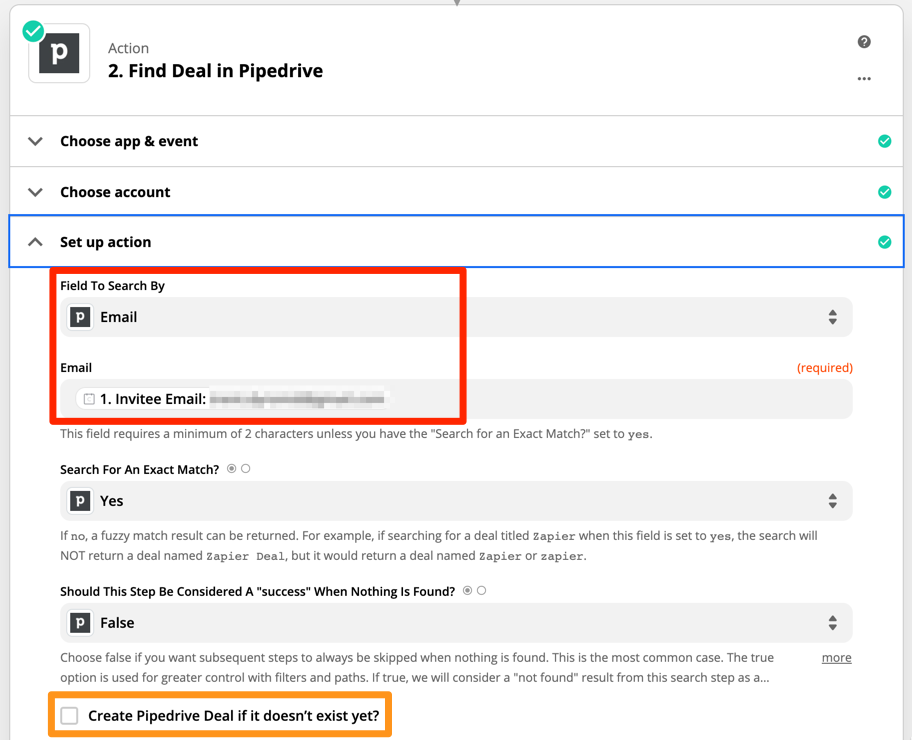
Once the event has been created in Calendly, the next step of the Zap is to use the appointment invitee’s email address to find the deal in Pipedrive.
Once Zapier finds the deal, in step 3, Zapier will update that deal’s stage to “Scheduled Demo”.
And finally, in step 4, Zapier will create a workflow in Flowster and assign that workflow to me (or whoever I designate in the zap).
We have an entire set of procedures with detailed instructions for setting up and managing an Amazon Seller account. Our Amazon Seller Playbook (ASP) will help you manage and maximize the efficacy of your (new) Amazon channel. These workflows are also specifically designed to allow you to delegate work to your team or virtual assistants.
Flowster
While not an automation tool per se, Flowster is superb at providing humans with detailed checklists of the things they need to do for a given activity.
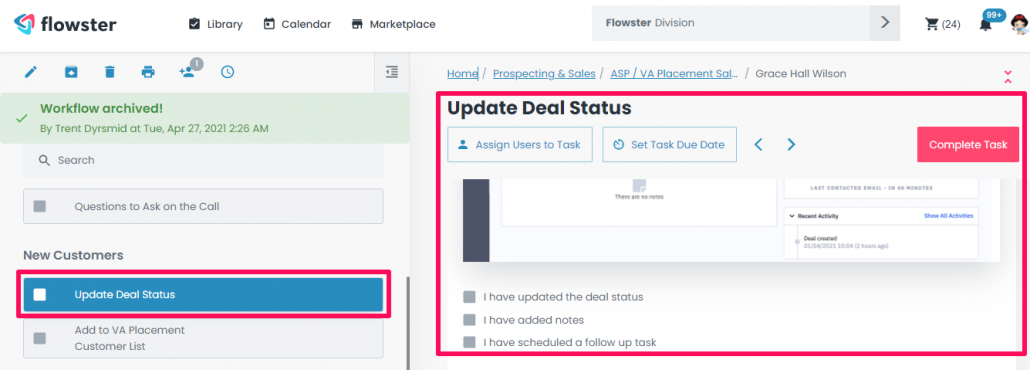
In the example above, that activity is a sales call and while a sales call can’t be automated, there are definitely things that the sales rep needs to do after the call to trigger further automation in the sales process.
For example, in the screenshot below, you’ll see that in step “Update Deal Status” of the workflow, after the sales call has been completed, the deal status needs to be updated. Without a workflow to remind a user to perform this task, it could (would) easily be forgotten.
So now that I have covered how to fully automate your outbound marketing system, let’s move on to chapter 6, where we’ll cover some additional advanced tips and strategies.
Chapter 6: Advanced Tips and Strategies
Now that you’ve built your outbound marketing automation engine and you are receiving a steady stream of replies, you need to look for ways to improve your response rates.
The key to maximizing your response rates is to have the most relevant message possible, and/or to take a somewhat unconventional approach.
Let’s dive into how I’ve had success doing that.
Be a Reporter
Earlier in this guide, I shared with you the success we’d had with our podcast guest recruitment campaign, and now I’d like to dive a little deeper into our “back door” strategy with this approach.
Plus, I want to share with you how you can take the same approach, even if you don’t have a podcast.
As a podcast host, I’m basically a reporter and as such, I’m constantly on the lookout for success stories to share with my audience.
And who doesn’t want to be featured as an example of success?
Most people love this kind of attention/flattery, and that is why being a “reporter” works so well.
But what if you don’t yet have a podcast?
Can you still take this approach?
You bet!
The way to do this is to behave just like a real reporter would…and that is to reach out to experts to tell them that you are writing an article about X and that as a part of your research, you are interviewing people who have expertise in X.
Obviously, not everyone is going to say yes, but one thing I can promise you is this: your approach as a reporter is likely to outperform your approach as a salesperson.
Everyone wants to be made to look good… and, most people don’t want to be “sold” stuff…and that is why being a reporter or analyst is so effective.
But wait, Trent! I have stuff to sell and I don’t get paid to write reports.
Good point, I say…but consider two ideas:
By creating interesting content, you will start to build an audience, and some percentage of that audience will buy your stuff
By generating rapport with your guests, you will also have the opportunity to talk to them about the stuff you sell, and some percentage of these folks will be open to buying
For years, I have used my position as a podcast host to further my businesses, and so when I say that being a reporter works, I speak from personal experience. 🙂
Reference Your Best Content
Depending on the size of companies you are reaching out to, it is doubtful that your first attempt at communicating with them will be a direct communication with the correct decision maker.
In reality, most of your early communications will be with people that have influence over the decision, but not the final call.
So how do you ensure that your message is taken to the decision maker(s) with the same level of detail that it would be if you were speaking to them in person?
Before I cover what will work, let me describe the wrong approach.
The wrong way to do this is to verbally tell the person you are talking to all the wonderful things about your product or service and then hope that they are going to be able to retell everything you said to their boss with all the rich detail that you used when you told it to them.
This is the impossible dream….and it won’t work.
Now that I have explained what doesn’t work, let me share with you what has worked well for me: blog posts and videos.
Once you have been at your craft for a while, you’ll learn exactly what all the most common questions and objections are – because you will have heard them many times.
My advice is that you make a list of these questions and objections, and then you create a separate piece of content that answers each objection/question.
That way, whenever you are communicating with someone other that the decision maker, you can now follow up with them by sending links to this content. So instead of attempting to regurgitate what you told them, they can simply forward your email along to their boss with whatever comments/endorsements they choose to include.
In my experience, I found that there were really only about 6-8 main objections/questions that I would receive over and over again…so that meant I had to create just 6-8 epically good blog posts that I could then use in my correspondence with my prospects. (if that sounds overwhelming, you could even start with one simple post that answers all the objections.)
Talk about a time saver!
Instead of retyping/saying the same things over and over again, I would simply include links to the blog posts in my emails.
Conclusion
A well built outbound marketing system can be complex and take some time to set up, but it’s worth it.
And unlike inbound marketing, with outbound you don’t have to spend time and money generating content and then have to wait for the leads to show up. If you want more leads, simply do more outreach.
Get Results Even Faster with Flowster's Outbound Marketing Playbooks
If you are already having some success with outbound and want to scale up your efforts without having to hire dedicated sales reps, we recommend you use the Full Outbound Marketing Playbook.
If you are not yet having success with outbound and are looking for some quick wins, we recommend you start with our LinkedIn Prospecting on Autopilot Playbook.


